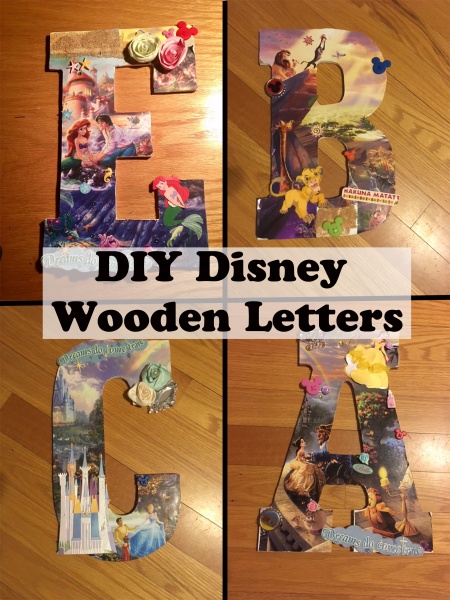
Looking for a way to liven up the kid’s toy room or bedroom? Maybe you’re looking for something fun for your home with a hint of Disney. These DIY Disney wooden letters are cute, simple and even multi-functional!
What you will need:
- Large, flat wooden letter (I would suggest white or black)
- A Disney scrapbook page, park map, or any other artwork
- Disney scrapbook stickers
- Mod podge
- Hot glue
- Brush
- Exacto knife (very fine & very sharp)
- Heavy duty magnets (optional)
- Hanging hook (optional)

Step 1:
Lay your wooden letter face up on a clean, flat surface. Carefully lay your Disney page of artwork over the letter to examine how you would like it to fall. When you’ve decided how you want it placed, cover the letter in a thin layer of mod podge. It’s important to not use to much mod podge because it will cause lumps in the page and could end up tearing.
Step 2:
Carefully cover the wooden letter with your page from top to bottom, ensuring all bubbles are out and not to tear the page. Carefully glue the page on using just your fingers.

Step 3:
Allow to dry for 1-2 hours.
Step 4:
Use your exacto knife to cut around the edges of the letter and remove the excess paper. Clean up any corners that are needed, to ensure a smooth, finished look.


Step 5:
Stick or glue gun on the scrapbook stickers of your choice. I like to use scrapbook stickers that correspond with the image I chose. For example, a Winne the Pooh inspired letter & artwork-use Winnie the Pooh scrapbook stickers. Position them however you like! You can use as many or as few as you’d like.


Step 6: (optional)
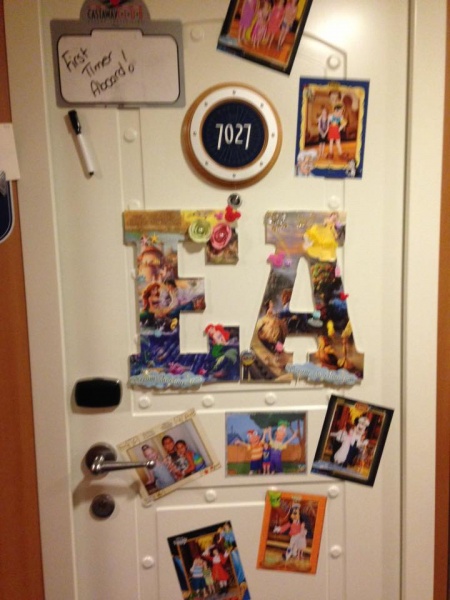
Adhere a wall hanging hook to the back of the letter if you choose to hang it on the wall. I have mine sitting on a ledge in my home, so I opted to not do this. You may also decide you want it on a metal surface such as a locker or fridge (or your cruise stateroom door!). In which case, feel free to adhere heavy duty magnets to the back!

And that’s it! Within an hour or so, you’ve got yourself a beautiful DIY Disney wooden letter for your home, work, locker, WHERE EVER you’d like to use them! Below I’ve got some added suggestions for how to take your letters to the next level.
Unique Ways to Display Them
Cruise Stateroom Door
When I initially made these, I made myself and my sister ones for our bedroom door. It was the Christmas before our cruise onboard the Disney Fantasy & it occurred to me that they would be a great addition to our stateroom door décor. So, I made two more for my Mom & Stepdad. We then adhered heavy duty magnets to the back of them & they became beautiful artwork for our stateroom doors! We got SO many compliments on them!! Check out another great article on fish extenders for your cruise or other DIY stateroom door decor

Where to Display Them At Home
I used to hang mine on the bedroom door for the longest time. I later turned a spare room in our home into a games room & decided that was the perfect place for them! Naturally, I couldn’t leave out my boyfriend & my dog, so I made them letters too! These letters can be used in any room in your home to bring a bit of Disney magic.
Another option is to use them on your work or school locker! Get those heavy duty magnets and you’ll have some Disney magic outside the home!
Creative Ways to Improve Your Letters
Character Autographs
Another great idea, is to take these letters and have characters (or the character the letter is focused on) sign them! You could choose to have just one letter for your name, spell out your whole name or your two initials & have even more autographs!
Park Maps
I also really like the idea of using the park maps for the letters. Again, you could get characters to sign them, or leave as is! These are a bit tricky to find online, so I would snag them next time you’re in the parks. I usually stock up on a couple when I am there for my crafting needs, even though I tend to use the My Disney Experience app if I actually need the maps.
And there you have it! A fun Disney craft for the whole family. Try out these DIY Disney wooden letters to bring some extra magic into your life.

Did you like this article? Make sure to share it with your friends! Check below for easy ways to share!
Incoming search terms:
- https://www themouseforless com/blog_world/diy-disney-wooden-letters/