

One of the options you’ll consider when planning your Walt Disney World vacation is whether to purchase Memory Maker. Memory Maker is a way to get all of the photos that were taken during your vacation. If you need help deciding whether Memory Maker is right for your family, you can read all about it here. But if you’ve already decided to purchase it, you know that buying in advance is the most economical way to do it. So here is a tutorial on how to pre-purchase Memory Maker!
The process can be done completely online or over the phone. If you’d rather purchase over the phone, you can call the resort directly at (407) 939-5277 and a Cast Member will walk you through the process. If you’d rather purchase online, you can follow the following steps!
Memory Maker Online Purchase Steps
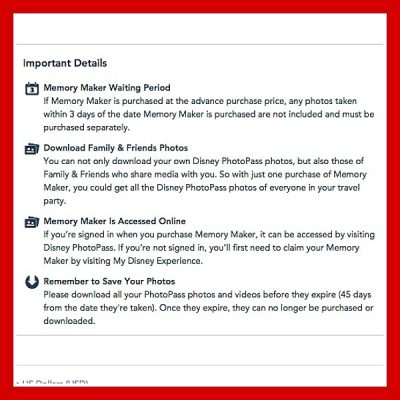
- First, visit the Memory Maker portion of the Walt Disney World Resort website (here). If you see the page below then you’re in the right spot!

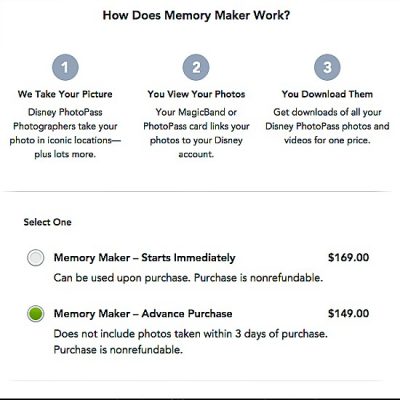
- While you’re on this page, you can read some additional information about Memory Maker. One important thing to note when pre-purchasing Memory Maker is that any photos taken within 3 days of purchase will not be included in your Memory Maker purchase. Therefore, you’ll want to pre-purchase Memory Maker at least 4 days in advance of your arrival at Walt Disney World. If you’re already within those 4 days and you want all of your pictures included, you will have to choose the “starts immediately” option, which costs $20 more.
- Speaking of your options, as you scroll down the page you’ll be able to select which option you need. As previously mentioned, if you’re 4+ days from arriving at Walt Disney World then select the “Advance Purchase” option to save $20! If you’re within 3 days of the start of your trip, you’ll have to consider which option works best for you.
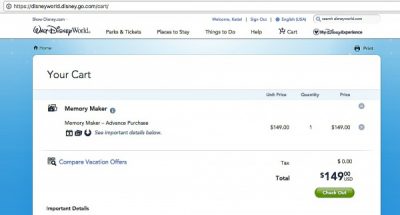
- Once you select your option, choose “Add to Cart” on the right side of your screen. Once you click that button you will be taken to your shopping cart where you can review your selection. At this point you’ll also want to make sure that you’re signed in to your My Disney Experience account. In the photo below, you can see that I am signed in since it says “Welcome, Katie!” at the top of the screen. As long as you’re signed in to the same account that includes your resort reservation and tickets, your Memory Maker purchase will link directly to your account.
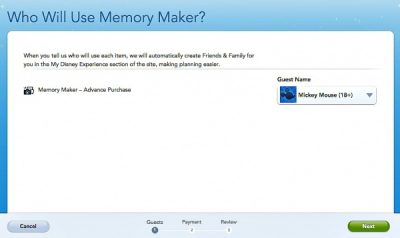
- After you’ve reviewed your selection, click the green check out button under your total. Then you’ll have to assign your Memory Maker purchase to a person in your My Disney Experience profile. You’ll want to select someone who will be on your trip, but it doesn’t particularly matter who you select! Your purchase allows you to download photos for anyone on your Friends & Family list. That means that no matter who actually “owns” the Memory Maker purchase, you’ll be able to get everyone’s photos!
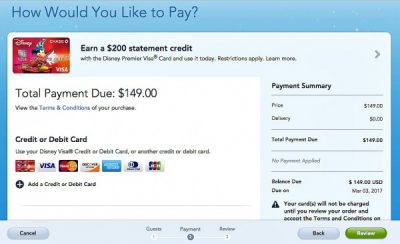
- Once you’ve assigned your Memory Maker purchase to a person in your account, you’ll click the green “Next” button at the bottom of the screen. Then you’ll be taken to the payment page where you’ll enter your payment information. Once you’ve done that you’ll just click the green “Review” button at the bottom of the screen. Then you’ll complete your purchase on the next screen!
- Once you complete your purchase, give the system some time to refresh. Then you should be able to to see Memory Maker under the “reservations and tickets” section of your My Disney Experience profile. And that’s it! You’re ready to start taking photos as soon as you arrive at Walt Disney World resort.
Have you purchased Memory Maker? What were your thoughts? Share in the comments.
Incoming search terms:
- https://www themouseforless com/blog_world/pre-purchase-memory-maker-walt-disney-world/
- nu vot
- https://www themouseforless com/blog_world/pre-purchase-memory-maker-walt-disney-world/#:~:text=One important thing to note arrival at Walt Disney World
- https://www themouseforless com/blog_world/pre-purchase-memory-maker-walt-disney-world/#:~:text=After youve reviewed your particularly matter who you select!
- memory maker advance purchase
- https://www themouseforless com/blog_world/pre-purchase-memory-maker-walt-disney-world/#:~:text=Once you complete your purchase at Walt Disney World resort
- pre purchase memory maker
- https://www themouseforless com/blog_world/pre-purchase-memory-maker-walt-disney-world/#:~:text=Therefore, youll want to arrival at Walt Disney World
- should i buy disney memory maker?
- how to preorder disney memory maker
what if you don’t have magic bands how does memory maker work then?