I’ve got a great DIY for you that is the perfect Valentine’s gift idea for the Disney fan in your life! Homemade, affordable & fun. Below learn more about a DIY Up! Canvas.
What you’ll need
-White Canvas – size of your choosing – I recommend at least a 8×10
-Blue paint
-Multi colour buttons
-Glue gun & hot glue
-Construction paper or sparkly paper (like I used)
-Colorful string
-Block letter stickers or stencils
-Paint brushes
-Mod podge (optional in step 2)
Step One
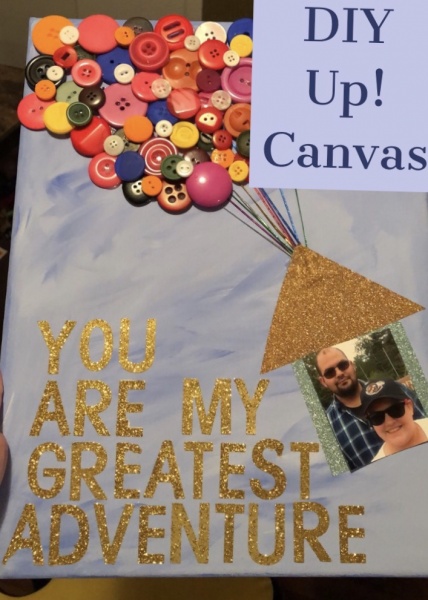
Lay your canvas on a flat surface, this will be the backdrop & sky for your project. Grab your blue paint & a paintbrush. I actually ended up mixing white & a deep shade of blue to make the colour I wanted. You can make your sky whatever colour you like! You can even add clouds if you feel so inclined. Paint the entire surface blue & allow to dry. If you want to add clouds, you can do so after the blue is dried and then allow the clouds to dry too. I chose to skip the clouds, and just pulled pieces of white through more in certain areas.

Step Two
Once your canvas is dried (I waited 24 hours, just to be safe-but most paint dries in just a few hours!) you can cut out a house shape for your picture frame. Also dig out your block letters or stencils. Size up where you want to put both the house & the letters. I would suggest the bottom right corner for the house, and putting the letters where ever they fit. If you are painting, be careful before you decide where to put it.
Once I figured out where I wanted it all to go, I first put on my gold letter stickers. I didn’t need any glue, as they were stickers. I would suggest using stickers as well, because it ensures there are no bumps. However, if you are just using non-sticker letters, you could use a very thin layer of mod podge to stick them on. Then, you are going to stick your house on. Again, my house paper was a sticker, so I was able to easily adhere it. If you are using non-sticky paper, you can use a thin layer of mod lodge. Leave the top of the room un-glued for about 2.5 inches. This is important for the next step.

Step Three
After your letters & house are stuck to the canvas, you’re going to get the strings on for the balloons. Take some thin string of your choice-I used a sparkly thread. Cut several pieces & group them together. Using your hot glue gun, glue the group of thread just under the top of the roof, then push the last of the roof down, so it sticks as well.


Step Four
Now you want to pull each string out, making sure it’s tight but the glue won’t be seen. To achieve this, I took a button and my hot glue, and stuck both a button and piece of string to the canvas at the same time. I did this until each piece of string was pulled out tight.

Step Five
Now it’s time to go button crazy! Using the hot glue, add buttons of all sizes and colours. (Savings tip! My local dollar store did not have a big selection of coloured buttons. So, I painted some white buttons! Spray paint is best for this, as acrylic paint does not stay easily on the button.) When you think your balloon bouquet looks complete, you’re ready for the final step.

Step Six
Take a favorite picture of the two of you & stick it to the house! I would use a thin layer of mod podge again. We are going on our first Disney trip together in September, so I opted to just use a piece of tape, because I plan to replace it after our trip!

There you have it! A simple, fun little craft to do for your partner this Valentine’s day. Who doesn’t love the movie Up?!
Did you like this article? Make sure to share it with your friends! Check below for easy ways to share!
Want to visit a Disney Parks destination? Contact The Magic for Less Travel for more information and a free, no-obligation quote.

I love this!